“Life is change. Growth is optional. Choose wisely.” —Karen Kaiser Clark
As New Year's Resolutions go, every year I resolve to take better care of this blog. After all, I pay for the rights to use its name... so I should get my money's worth.
In addition, I have convinced myself that at least one person in this world is sitting around waiting for me to post my musings. That might not be true, but we choose what we want to believe and that is the truth for us.
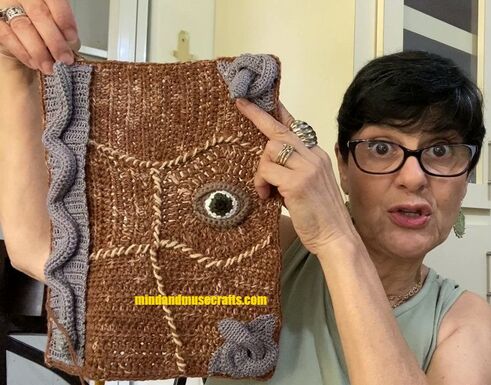
So, in honor of that one silent viewer, I am posting today... January 1, 2023, to share my experiences with a particular project that I completed on December 24th, 2022 (quite photo finish for Christmas), even though I began working on it at the beginning of November.
The idea for this special project came through my eldest daughter who has been a fan of the movie Hocus Pocus since it first came out in 1993. The release of the second movie this September inspired me to crochet an agenda cover based on Book, the spell book presented in the movies.
If you have no idea what I am talking about, check out the link below.
evil.fandom.com/wiki/Spellbook
In this post, I would like to share my experiences with that project.
In addition, I have convinced myself that at least one person in this world is sitting around waiting for me to post my musings. That might not be true, but we choose what we want to believe and that is the truth for us.
So, in honor of that one silent viewer, I am posting today... January 1, 2023, to share my experiences with a particular project that I completed on December 24th, 2022 (quite photo finish for Christmas), even though I began working on it at the beginning of November.
The idea for this special project came through my eldest daughter who has been a fan of the movie Hocus Pocus since it first came out in 1993. The release of the second movie this September inspired me to crochet an agenda cover based on Book, the spell book presented in the movies.
If you have no idea what I am talking about, check out the link below.
evil.fandom.com/wiki/Spellbook
In this post, I would like to share my experiences with that project.
Initial thoughts
I knew I wanted my version to be a book cover for an 8.5 in x 11 in daily planner, so that my daughter could reuse this if she wanted to every year. My completed project was placed over a sketchbook that I purchased because I decided to let her purchase her own planner. You know like when you buy a toy that doesn't come with batteries.
I also knew that I wanted to crochet as many elements of the original Book as I could. You can find other ways to make replicas of Book in many blog posts on the Web and/or in videos on YouTube.
My design process.
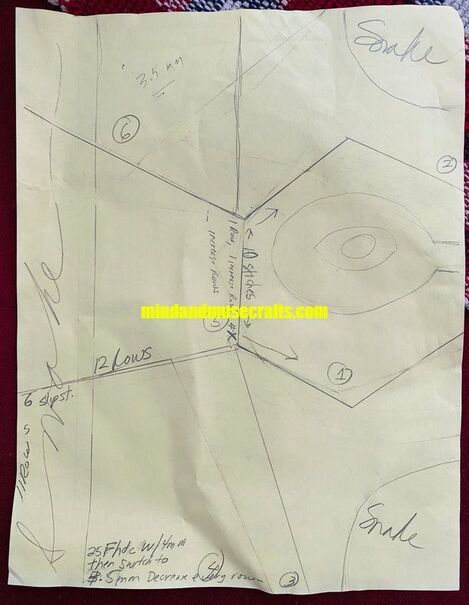
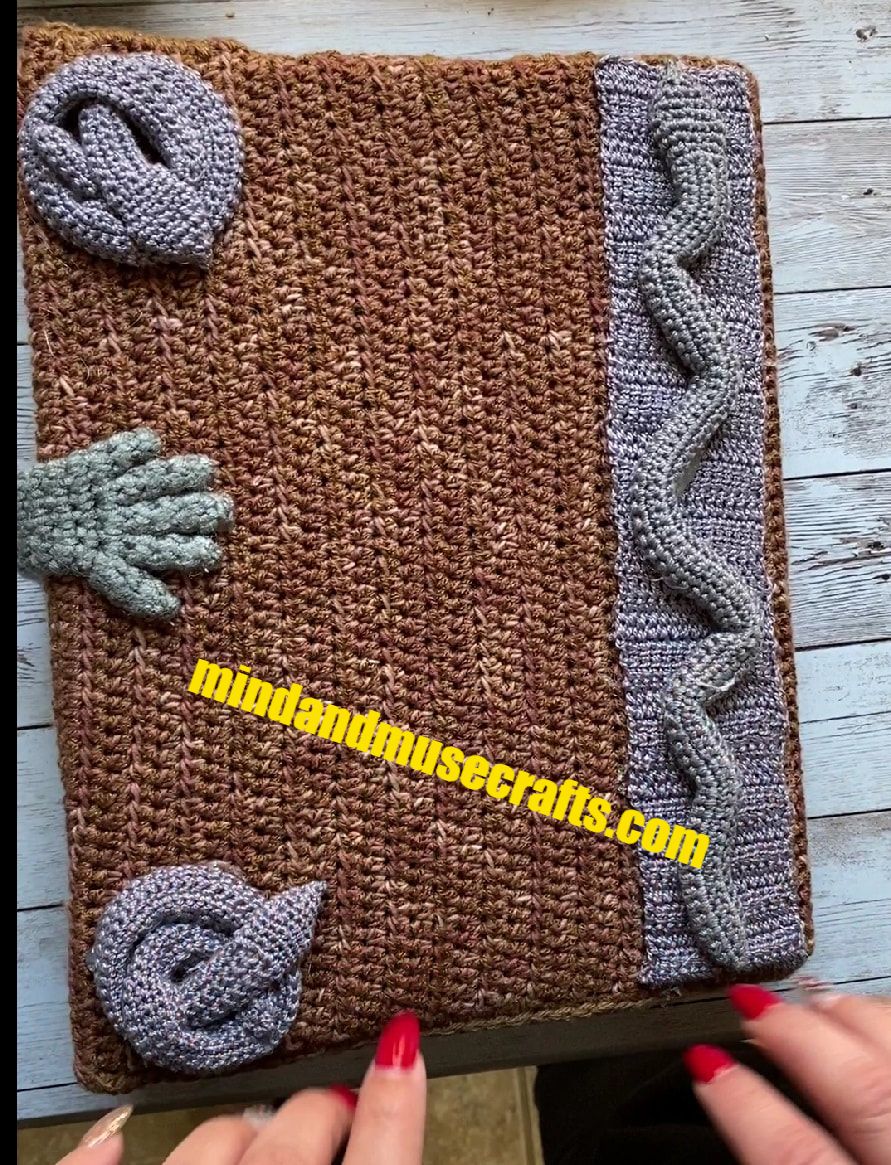
1) I decided to begin my replication of Book by crocheting pieces with different shapes that would be stitched together. So, I started by making a sketch on paper of what I wanted the front cover to look like.
I knew I wanted my version to be a book cover for an 8.5 in x 11 in daily planner, so that my daughter could reuse this if she wanted to every year. My completed project was placed over a sketchbook that I purchased because I decided to let her purchase her own planner. You know like when you buy a toy that doesn't come with batteries.
I also knew that I wanted to crochet as many elements of the original Book as I could. You can find other ways to make replicas of Book in many blog posts on the Web and/or in videos on YouTube.
My design process.
1) I decided to begin my replication of Book by crocheting pieces with different shapes that would be stitched together. So, I started by making a sketch on paper of what I wanted the front cover to look like.
2) I lifelong philosophy has been to never reinvent the wheel. So, I decided to first go online to search for patterns (preferably freebies) that I could use or modify to construct the different elements of my front cover.
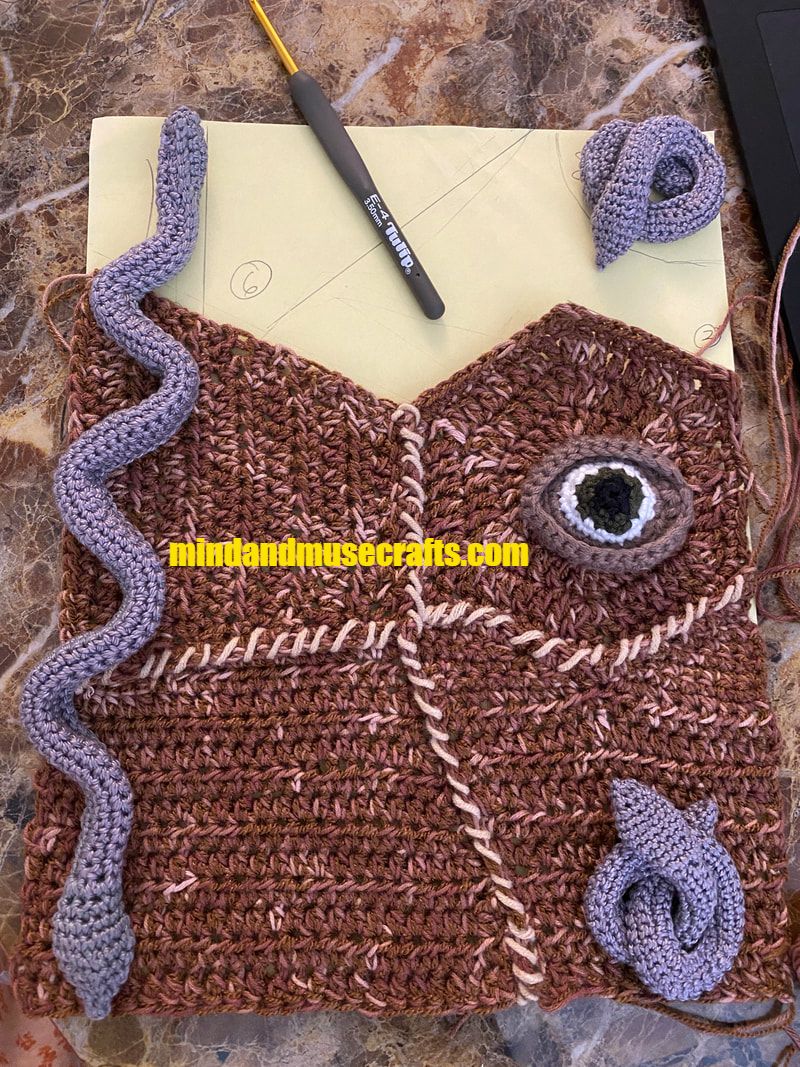
This project incorporates elements of free-style crochet along with pattern-based designs. For example, the irregular shaped pieces of skin are made separately and then joined with whip stitches. However, I also incorporated several free patterns found on the internet for various parts of my Book. Here is a list of patterns that inspired or guided my work.
a. Snakes
lindaloo.com/pdfs/Garden-Snake_LindalooEnterprises.pdf
b. The eye: www.thesunandtheturtle.com/2014/05/a-self-portrait-made-in-crochet-part-2.html
c. Piece of skin around the eye
raffamusadesigns.com/crochet-solid-hexagon-no-gaps/
d. The snakes in the corners had a metal plate underneath that I saw as a half-square:
youtu.be/2v7Vd2Y8zGE
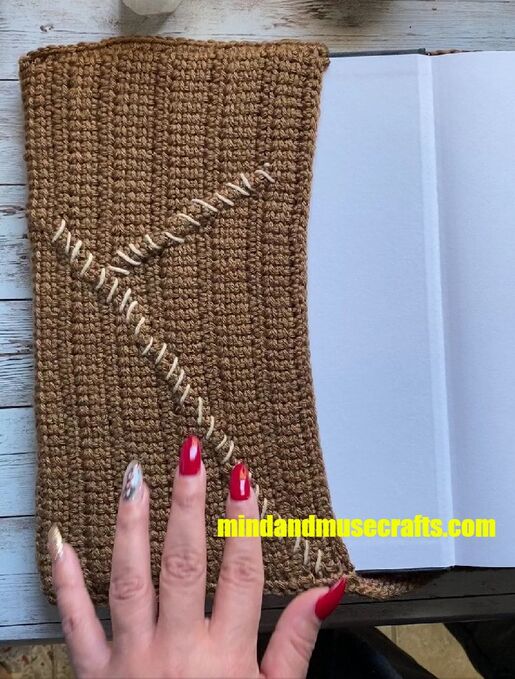
3) For the skin, I used a cotton-linen fingering weight yarn I had in stash, held together with a polyester fingering weight yarn and a 3.5 mm hook. So, I would say, I had the gauge of a DK weight yarn. First, I made the hexagon shaped piece using US dc (Part c from above). Then, I used the number of stitches along the side of the hexagon to help plan the other shapes using US hdc in free style crochet (no pattern). I continuously compared to my original sketch to know how many stitches I needed and how wide and long to make the pieces.
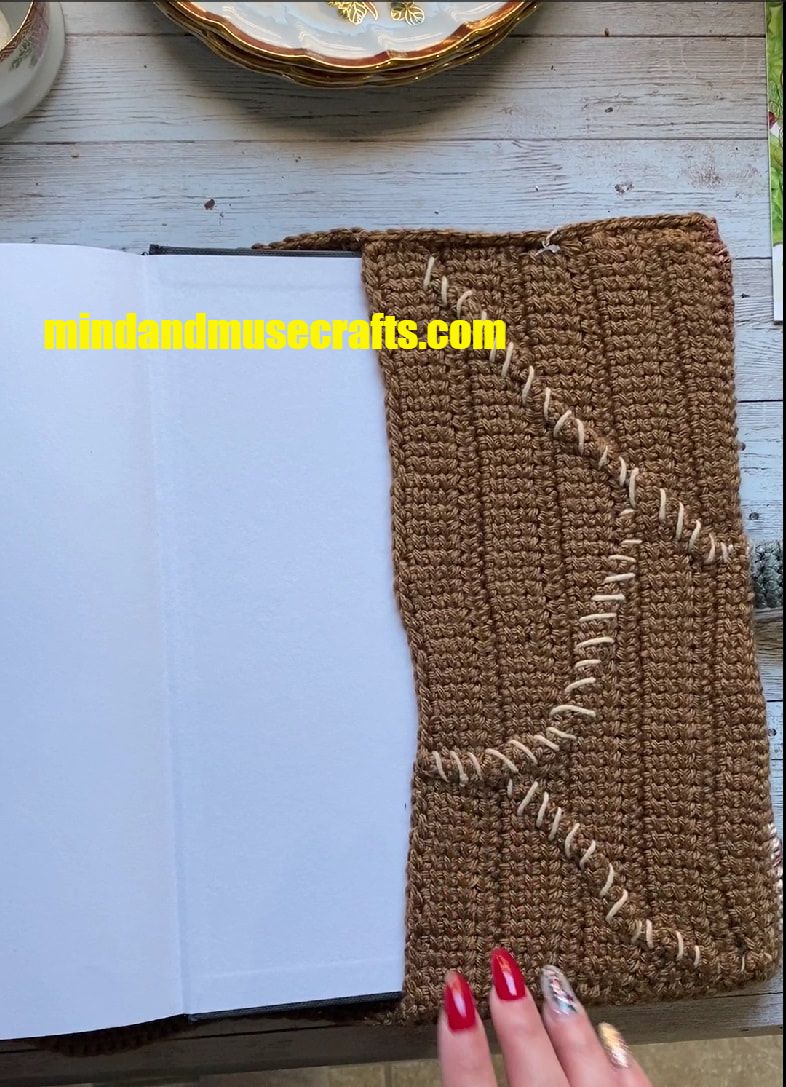
I figured out at some point that I could make my edges slant by leaving a stich at the end of each row unworked, or changing my stitch length (i.e., using hdc as opposed to sc, or sc instead of hdc). Working vertically instead of horizontally also helped. Knowing how to make my figures slant in crochet helped, but, ultimately, it was a lot of trial and error, a lot of ripping back and a lot of adjusting my original plan to what I was actually able to accomplish. Once each piece fit correctly with the previously made ones, I could whip-stitch the pieces together with a darning needle and a worsted weight cotton blend I had in my stash.
This project incorporates elements of free-style crochet along with pattern-based designs. For example, the irregular shaped pieces of skin are made separately and then joined with whip stitches. However, I also incorporated several free patterns found on the internet for various parts of my Book. Here is a list of patterns that inspired or guided my work.
a. Snakes
lindaloo.com/pdfs/Garden-Snake_LindalooEnterprises.pdf
b. The eye: www.thesunandtheturtle.com/2014/05/a-self-portrait-made-in-crochet-part-2.html
c. Piece of skin around the eye
raffamusadesigns.com/crochet-solid-hexagon-no-gaps/
d. The snakes in the corners had a metal plate underneath that I saw as a half-square:
youtu.be/2v7Vd2Y8zGE
3) For the skin, I used a cotton-linen fingering weight yarn I had in stash, held together with a polyester fingering weight yarn and a 3.5 mm hook. So, I would say, I had the gauge of a DK weight yarn. First, I made the hexagon shaped piece using US dc (Part c from above). Then, I used the number of stitches along the side of the hexagon to help plan the other shapes using US hdc in free style crochet (no pattern). I continuously compared to my original sketch to know how many stitches I needed and how wide and long to make the pieces.
I figured out at some point that I could make my edges slant by leaving a stich at the end of each row unworked, or changing my stitch length (i.e., using hdc as opposed to sc, or sc instead of hdc). Working vertically instead of horizontally also helped. Knowing how to make my figures slant in crochet helped, but, ultimately, it was a lot of trial and error, a lot of ripping back and a lot of adjusting my original plan to what I was actually able to accomplish. Once each piece fit correctly with the previously made ones, I could whip-stitch the pieces together with a darning needle and a worsted weight cotton blend I had in my stash.

4) The snakes were made with Aunt Lydia's #10 and a 1.75 mm hook for the coiled snakes, and #3 crochet thread, with a 2.5 mm hook for the extended snake. I used 70 stitches for the coiled snakes and 75 stitches for the extended snake. Other than that, I followed the instructions given by the pattern mentioned above (Point a). In the version of Book in the movie, you can observe that underneath each snake there is a metal plate. To make the metal plates, I crocheted a rectangle for the long snake using Aunt Lydia's #3 and a 2.5 mm hook, and for the coiled snakes, I crocheted several half squares and sort of rounded out the hypotenuse (the longest edge) when I was finished. (Ultimately, I only had time before Christmas to make these "metal" plates for the front.)
5) The eyeball was made with worsted weight yarn with a 3.5 mm hook following the instructions in Point b from above.
5) The eyeball was made with worsted weight yarn with a 3.5 mm hook following the instructions in Point b from above.
6) Once the front was complete, I single crocheted all around the edge. Next my plan was to pick up stiches starting at the left side and crochet the back and the back flap completely. I reduced my hook to a 3.25 and using US hdc's I picked up 70 stitches. I ran out of yarn when I finished the back, so I changed my yarn to Lion Brands Skein Tone yarn in the Mahogany colorway (continued with the 3.25 mm hook) and changed my stitch to linked treble crochets. (No design justification here... just because...) I made the front and back flaps about 4.5 inches wide each. Then, I secured the flaps at the top and bottom to the front and back panels with single crochets on the outside and across the entire edge. Finally, I wanted the inside flaps to have some scar marks, so I pinched the fabric between my fingers and whip stitched in different directions.
7) Next up was to complete the front by making the latch that goes over the eye and locks the book. This is actually the multimedia part of the project. To create the latch, I formed a large oval (large enough to go over the eye) by using several rounds of jute twine and taping them together with duct tape. Then, I crocheted over the duct tape with a chunky grey yarn.
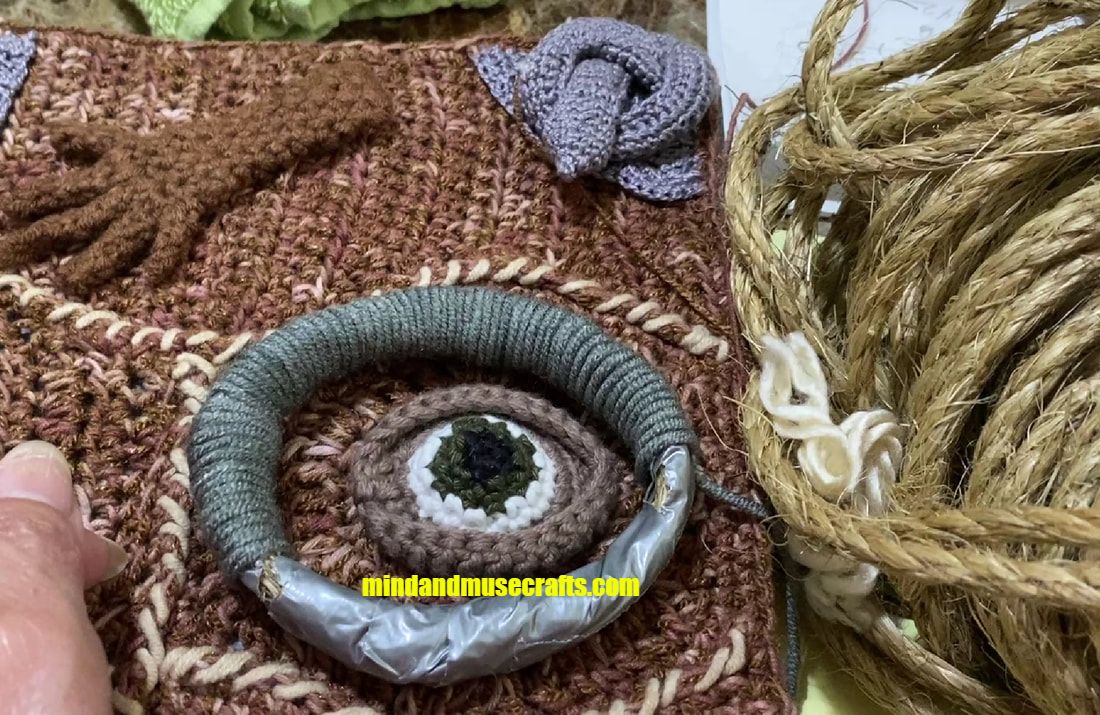
After reaching the beginning of the round of the latch, I picked up 5 stitches in US single crochet in the back loop of the next 5 stitches. Then, I turned to single crochet in the front loop of these same stitches. (Phew ... that is a mouthful). This created a cylinder like form for the arm. I continued to work in unjoined rounds until the arm was long enough to reach the back. Then I used a tutorial for making a hand with fingers that can be found on the Crafty is Cool channel on YouTube.
youtu.be/jInm8kWTv0g
I glued this hand at the back. To keep the latch in place over the eye, I glued a metal plate on the inside of the front panel to the left of the eye, and then glued a small piece of magnet to the bottom of latch, at the left side. It did not give a tight hold but was strong enough, so the latch doesn't hang from the front when the book is turned over.
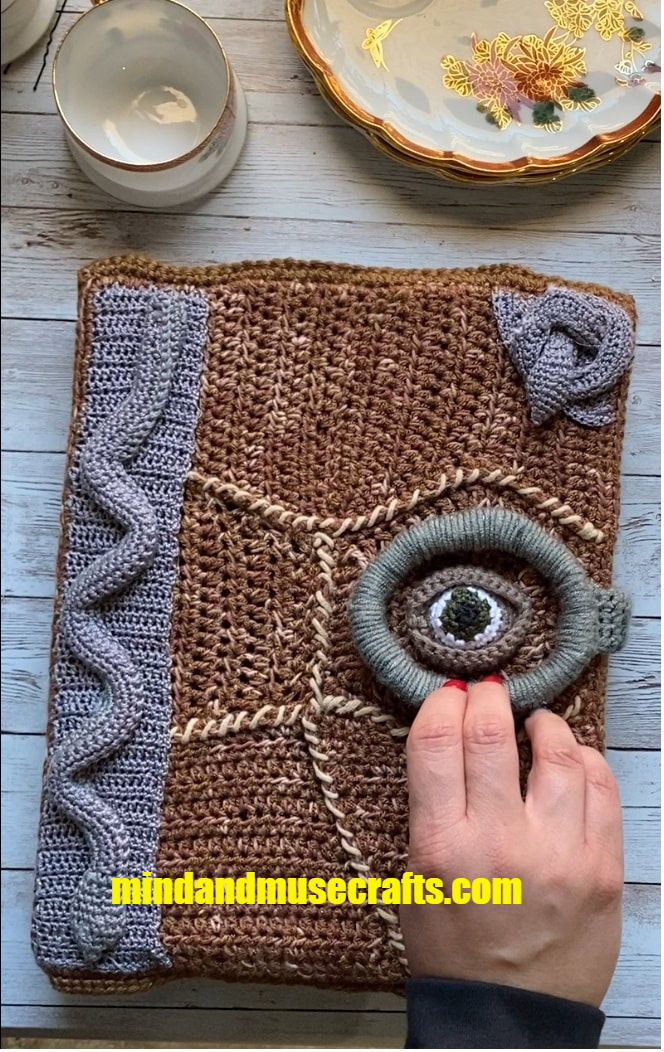
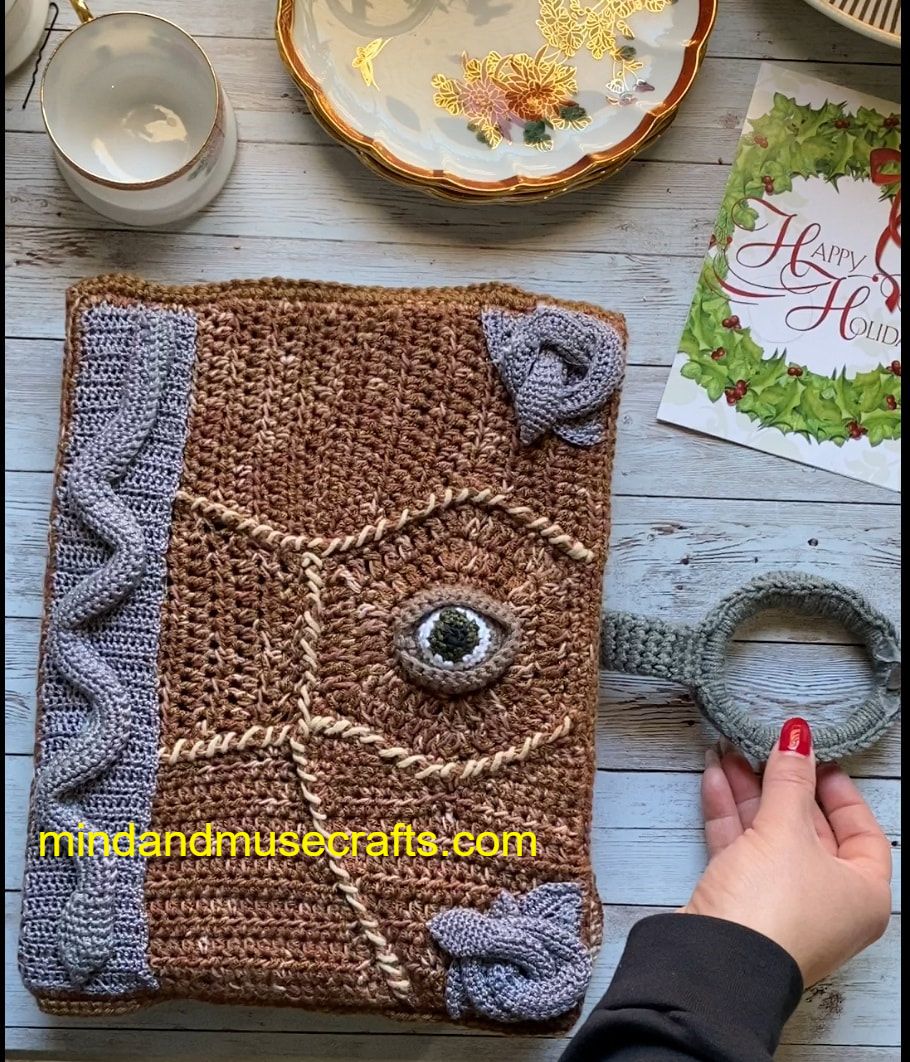
8) Now that most of the elements were complete, the last thing I had time for was to glue the snakes in their positions at the front and back. I didn't have time to make the metal plates for the coiled snakes on the back or add some scar stitches. I also would have liked to make little fingers that can be seen on the spine of the original spell book in the movie, but Christmas arrived, and my time was out. However, if I ever decide to complete this detail, I did find a free pattern for Zombie fingers on the Internet. I know.... crazy, right? Who would have thought? You can find a pattern to crochet zombie fingers here:
www.buddyrumi.com/blog/2012/10/25/zombie-fingers-free-pattern.html?rq=zombie%20finger&utm_content=buffer8ff12
www.buddyrumi.com/blog/2012/10/25/zombie-fingers-free-pattern.html?rq=zombie%20finger&utm_content=buffer8ff12
Final remarks
Finally, I'll say that the recipient seemed quite pleased with her Book and, I, the maker, found this to be a very satisfying project with lots of room for learning new skills and thinking outside the box. If you have a special person who is a fan of Harry Potter or The Mummy or Hocus Pocus or any of the Hollywood movies in which a special book appears... for sure, you could use some of the techniques I describe here to make them a treasured keepsake.
Finally, I'll say that the recipient seemed quite pleased with her Book and, I, the maker, found this to be a very satisfying project with lots of room for learning new skills and thinking outside the box. If you have a special person who is a fan of Harry Potter or The Mummy or Hocus Pocus or any of the Hollywood movies in which a special book appears... for sure, you could use some of the techniques I describe here to make them a treasured keepsake.
 RSS Feed
